Hands-On Guide: Building Efficient APIs with Node.js - Part 2
To know more about the technologies used in API development. Second part of a three part series.
In our previous article, we delved into API endpoints, project structure, package usage, and fundamental code structure. I would recommend you read Hands-On Guide: Building Efficient APIs with Node.js - Part 2 first and proceed with this article.
Setting Up MongoDB Atlas:

Let's begin by setting up MongoDB Atlas , a cloud-based database service that simplifies database management, especially during deployment. The MongoDB free tier offers ample space for starting out, with a generous shared cluster plan cap of 512MB.
Here's how you can set up MongoDB:
- Logging in and Database access
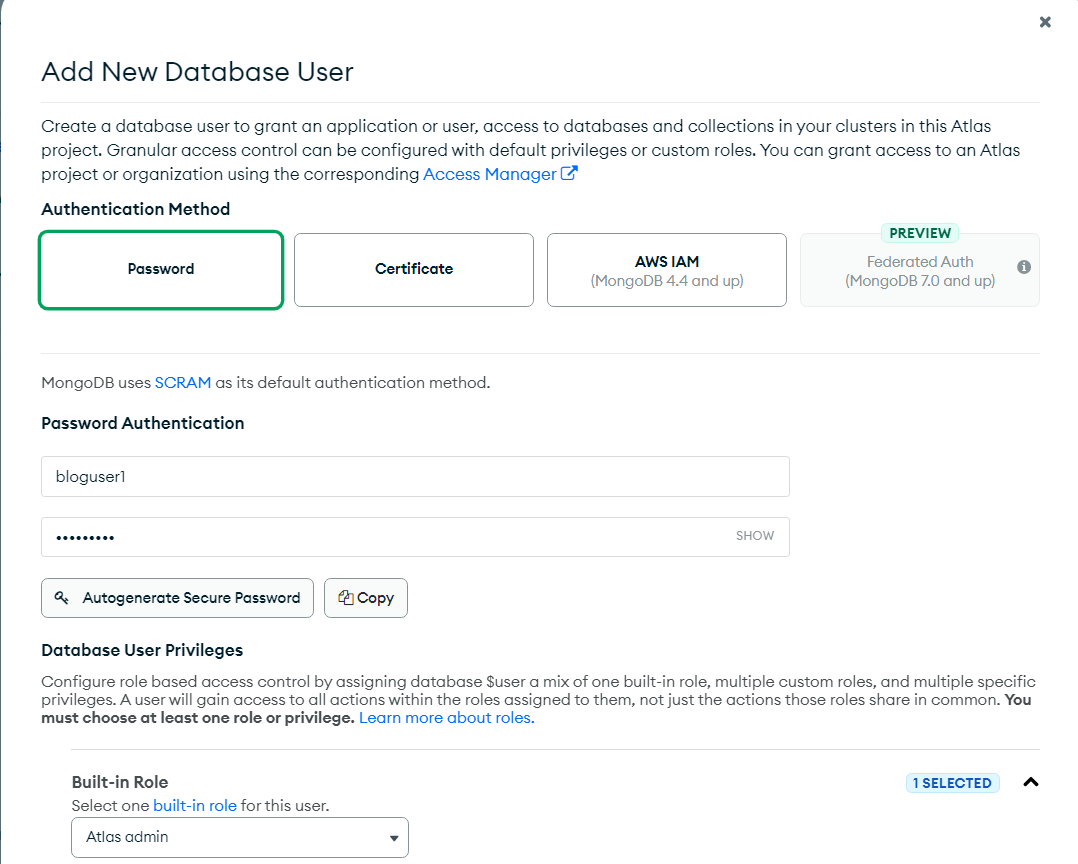
After logging in, access the "Database Access" section under Security.
Add a new database user with appropriate credentials.
Choose "Atlas Admin" as the Built-in Role or select a role based on your requirements.
- Network Access Configuration:
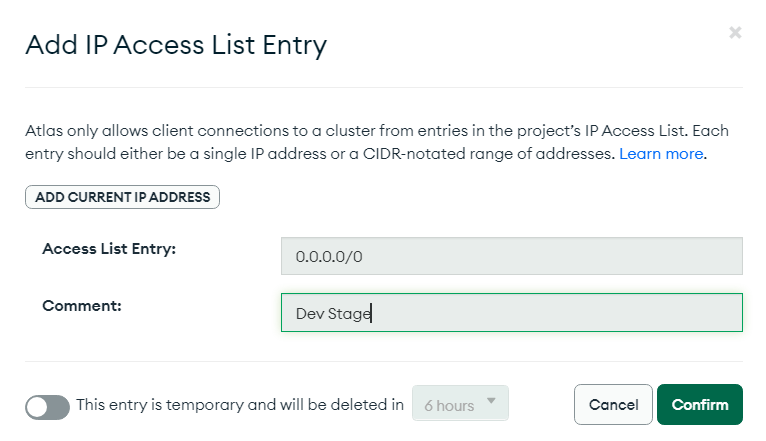
Navigate to "Network Access" under Security.
Add an IP address. During development, allowing all IPs (0.0.0.0/0) can be suitable. Remember to restrict IPs during deployment.
- Copying driver code
Go to the "Database" section under the "Deployment" tab.
Click on "Connect" and select the "Driver" option.
Choose "Node.js" as the driver and specify the version you're using.
Copy the connection string provided and store it securely. This connection string will be used to establish a connection from your API to the database.
Connecting to MongoDB Atlas with Mongoose:
- Add nodemon.json in .gitignore and add the copied string in the following format. Don’t forget to replace <password> with your password. <username> should be replaced with your username if there are multiple users in your database. This string is used to access our database and it shouldn’t be made public to avoid unauthorized access. Alternatively, you can use dotenv package or simply set up an environment variable in your terminal.
{
    "env" : {
        "MONGODB_URL" : "mongodb+srv://<username>:<password>@cluster0.kgz6ota.mongodb.net/?retryWrites=true&w=majority"
    }
}
- Add the following code in app.js. If there is no error, console.log() will be executed. It is recommended to add a custom dbName; otherwise all your collections will be created in a single database which might lead to conflicts.
mongoose.connect(process.env.MONGODB_URL, {
    dbName: 'testAPI'
});
console.log('MongoDB is connected.');
- Run the server and verify if the MongoDB connection is properly working.
Defining Schemas with Mongoose
api/models/Users.js
Define the Users schema with essential user information.
Export the schema as a Mongoose model.
const mongoose = require('mongoose');

// Define a Mongoose schema for the 'Users' collection
const userSchema = mongoose.Schema({
    _id: mongoose.SchemaTypes.ObjectId, // Unique identifier for the user
    name: String, // User's name
    email: String, // User's email address
    password: String // User's password (note: should be hashed and salted in a real application)
});

// Export the Mongoose model based on the schema
module.exports = mongoose.model('Users', userSchema);
api/models/Messages.js
Create the Messages schema with message details.
Reference the message schema to user collection using ref.
Export the schema as a Mongoose model.
const mongoose = require('mongoose');

// Define a Mongoose schema for the 'Messages' collection
const messageSchema = mongoose.Schema({
    _id: mongoose.SchemaTypes.ObjectId, // Unique identifier for the message
    user: {
        type: mongoose.SchemaTypes.ObjectId, // Reference to the 'Users' collection
        ref: 'Users' // Referencing the 'Users' model
    },
    postedOn: Date, // Timestamp for when the message was posted
    content: String // Content of the message
});

// Export the Mongoose model based on the schema
module.exports = mongoose.model('Messages', messageSchema);
- These models should be imported in our route files. Let’s now write codes for our API endpoints.
API Endpoints Implementation
api/routes/Users.js
I would suggest you to refer to the Github repository for the codes and compare them with the article.
get all the users
 const mongoose = require('mongoose');
 const Users = require('../models/Users'); // Import the Users model

 router.get('/', (req, res) => {
     // Use the Users model to find all users
     Users.find()
         .select('_id name email password') // Select specific fields to retrieve
         .exec() // Execute the query
         .then(users => {
             res.status(200).json({
                 users: users.map(user => ({
                     _id: user._id,
                     name: user.name,
                     email: user.email,
                     password: user.password,
                     request: {
                         type: 'GET',
                         url: 'http://localhost:3000/users/' + user._id // Generate URLs for individual user profiles
                     }
                 }))
             });
         })
         .catch(err => {
             res.status(500).json({
                 error: err // Handle errors by sending an error response
             });
         });
 });
get user by Id
 router.get('/:id', (req, res) => {
     Users.findById(req.params.id)
         .select('_id name email password')
         .exec()
         .then(user => {
             res.status(200).json({
                 user: user,
                 request: {
                     type: 'GET',
                     url: 'http://localhost:3000/users/'
                 }
             });
         })
         .catch(err => {
             res.status(500).json({
                 error: err
             });
         });
 });
post a user
 router.post('/signup', (req, res) => {
     // Create a new user instance based on the Users model
     const user = new Users({
         _id: new mongoose.Types.ObjectId(), // Generate a new ObjectId for the user
         name: req.body.name, // Get the name from the request body
         email: req.body.email, // Get the email from the request body
         password: req.body.password // Get the password from the request body
     });

     // Save the user instance to the database
     user.save()
         .then(user => {
             res.status(201).json({
                 message: 'User saved successfully!', // Send a success message
                 user: user // Send the saved user in the response
             });
         })
         .catch(err => {
             res.status(500).json({
                 error: err // Handle errors by sending an error response
             });
         });
 });
patch a user
 router.patch('/:id', (req, res) => {
     const updateOps = {}; // Initialize an empty object to store update operations

     // Loop through the array of update operations in the request body
     for (const ops of req.body) {
         updateOps[ops.propName] = ops.value; // Assign each operation to the updateOps object
     }

     // Use the Users model to find and update a specific user by ID
     Users.findByIdAndUpdate(req.params.id, updateOps)
         .exec() // Execute the query
         .then(user => {
             res.status(200).json({
                 message: 'User patched successfully!', // Send a success message
                 user: user // Send the updated user in the response
             });
         })
         .catch(err => {
             res.status(500).json({
                 error: err // Handle errors by sending an error response
             });
         });
 });
delete a user
 router.delete('/:id', (req, res) => {
     // Use the Users model to find and delete a specific user by ID
     Users.findByIdAndDelete(req.params.id)
         .exec() // Execute the query
         .then(user => {
             res.status(200).json({
                 message: 'User deleted successfully!', // Send a success message
                 user: user // Send the deleted user in the response
             });
         })
         .catch(err => {
             res.status(500).json({
                 error: err // Handle errors by sending an error response
             });
         });
 });
Note that we still have to write login method. We will get back to it when we discuss authentication. Similarly, in api/routes/Messages.js, focus on implementing GET requests as POST, PATCH, and DELETE requests share similar structures as in Users.js.
api/routes/Messages.js
get all the users
 router.get('/', (req, res) => {
     Messages.find()
         .populate('user') // Use populate to fetch the referenced user information
         .exec() // Execute the query
         .then(messages => {
             res.status(200).json({
                 messages: messages.map(message => ({
                     message: message, // Send the entire message object
                     request: {
                         type: 'GET',
                         url: 'http://localhost:3000/messages/' + message._id
                     }
                 }))
             });
         })
         .catch(err => {
             res.status(500).json({
                 error: err // Handle errors by sending an error response
             });
         });
 });
Note that populate(‘user’) will return the user details who posted the message.
get by Id
 router.get('/:id', (req, res) => {
     Messages.findById(req.params.id).populate('user').exec()
         .then(message => {
             res.status(200).json({
                 message: message,
                 request: {
                     type: 'GET',
                     url: 'http://localhost:3000/messages/'
                 }
             })
         })
         .catch(err => {
             res.status(500).json({
                 error: err
             })
         });
 });
get by user Id
 router.get('/users/:id', (req, res) => {
     Messages.find({ user: req.params.id }).populate('user').exec()
         .then(messages => {
             res.status(200).json({
                 messages: messages.map(message => {
                     return {
                         message: message,
                         request: {
                             type: 'GET',
                             url: 'http://localhost:3000/messages/' + message._id
                         }
                     }
                 })
             });
         })
         .catch(err => {
             res.status(500).json({
                 error: err
             })
         });
 });
That pretty much covers the routes. Now, let’s test our API in localhost.
Testing with Postman

Utilise Postman, an essential tool for building, testing, and documenting APIs. Create a new collection and employ various request types (GET, POST, PATCH, DELETE) to interact with your API endpoints. Validate responses and ensure your API functions smoothly.
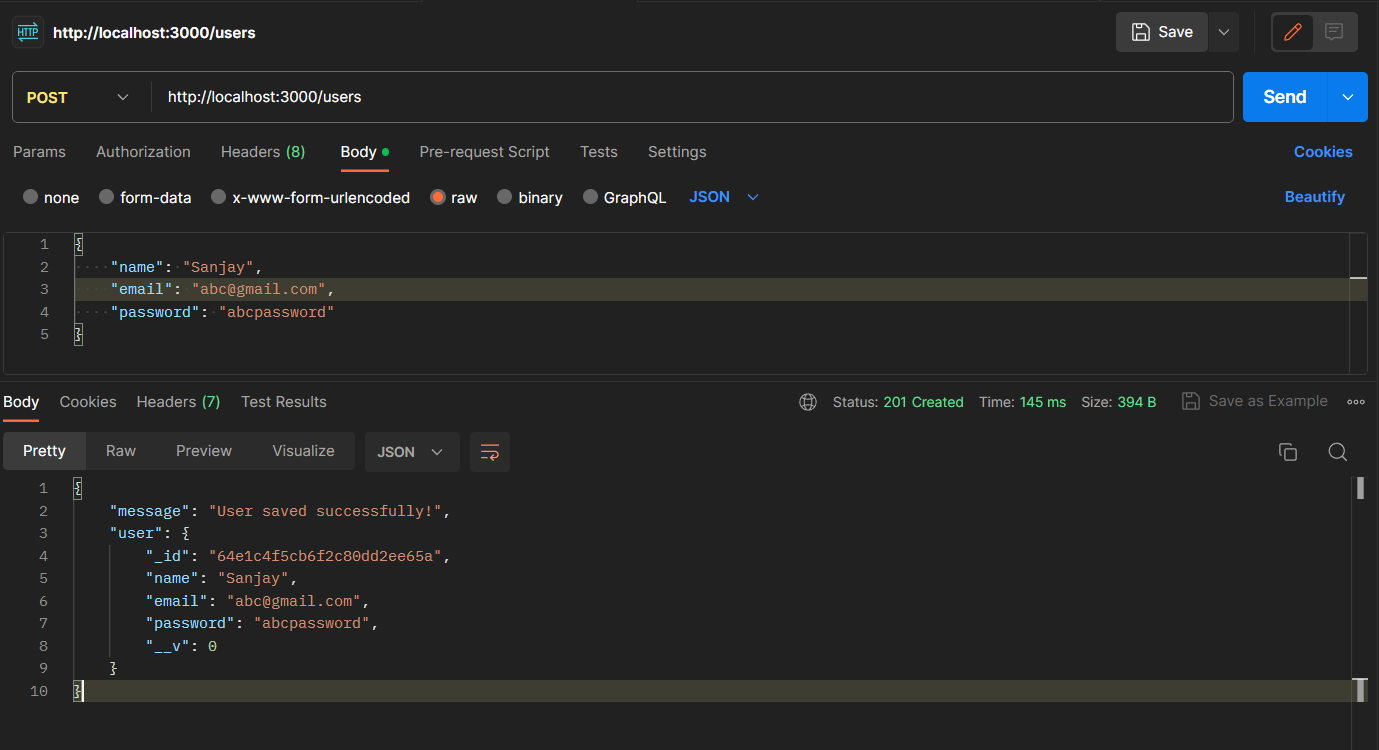
Create a new collection and add new request in the Postman app. Make sure your API is running. Select the request type as POST and enter the following URL:
http://localhost:3000/usersGo to Body → raw → JSON (in the dropdown) and paste the following snippet
 {
     "name": "Sanjay",
     "email": "abc@gmail.com",
     "password": "abcpassword"
 }
Send a request and you’ll get something like the following as a response.
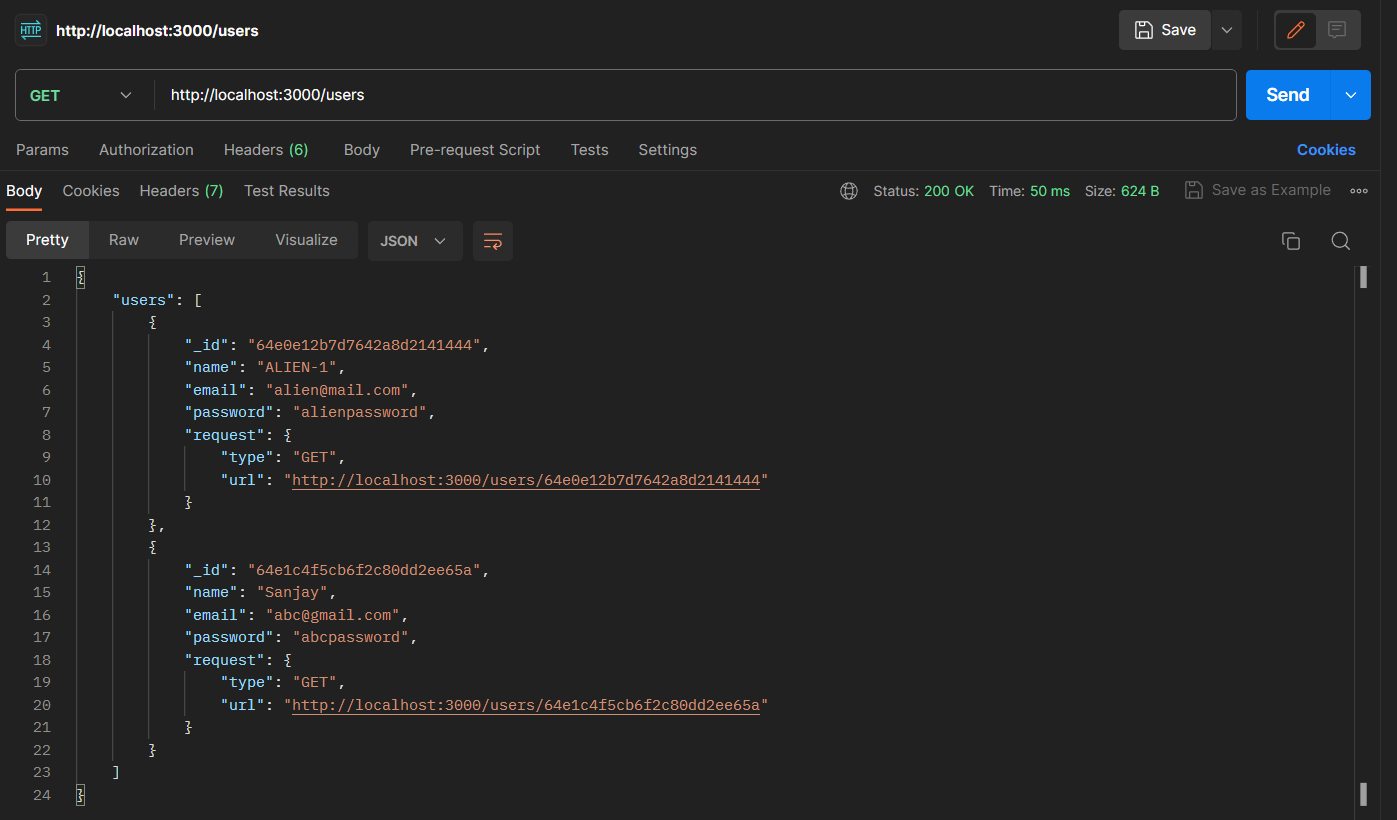
Let’s make a GET request and check the response.
Let’s make a request to an endpoint that doesn’t exist.

- PATCH request is a little tricky. Multiple values should be updated with a single request. The following code snippet makes it easier for the backend to handle such scenarios:
[
    {
        "propName": "email",
        "value": "email@email.com"
    }
]
Scenarios and Considerations
Test for all the API endpoints and make sure that your API can handle all the scenarios. The following are some of the scenarios that may occur while requesting our API.
Handling Empty Collections
- API returns an empty collection when you’re making GET requests before posting anything. Consider using 404 error status for such scenarios.
Nonexistent _id Handling
- When the _id passed to the backend doesn’t exist in our database, consider using 404 error status again.
Handling a non-existent API Endpoint
- This scenario has been handled in the previous article.
Referencing a Deleted Object
Consider the following example: a user is created and a message is posted by the user. After the message is posted, the user deletes his account. Now when you try to populate(), Node.js throws an internal server error (in multiple decompositions) or returns a null value (in a single decomposition).
You can either delete all the messages referenced to the user upon account deletion.
You can also filter out messages that are not referenced to an user before sending a response.
Note: The HTTP 404 status code is a standard response that indicates that the server could not find the requested resource.
We’ve successfully integrated the database and tested our API.
Repository: github.com/SanjayNithin2002/substack-api
Next Stop: Security and Deployment
In our next post, we’ll authenticate all the incoming requests using JSON Web Tokens and deploy our API on Render, so that it will be easy to integrate with other services: Hands-On Guide: Building Efficient APIs with Node.js Part 3.
